Monday, January 6, 2014

Project: Lens Cap Drawstring Bag

I had recently made a camera strap cover for a good friend, and although I included pockets, I didn't think to ask how big her lens cap was!  I thought I had enough material to make her another with larger pockets, but when I settled in to do this during the kids nap time today, I saw that I didn't.  I will have to make her another at some point, but until I can get back out to the store to get more supplies, I figured I'd make a temporary "fix" for her so she doesn't misplace that lens cap!  I even remembered to take pictures so that I could share this with you!

Introducing...


First, grab your lens cover!  Next, you'll want a rectangle of fabric that your lens cover will definitely fit in plus at least an inch or more on top to create the area for the ribbon.

For my project, I had 1/8" ribbon on hand, so the chassis for the drawstring didn't need to be too big.  You will want to adjust this to the materials you want to use.

My fabric measured 9" x 5"
My ribbon was 1/8" ribbon and I needed two lengths of it measuring 26" each. This is because they are extra long so my friend can attach them however she wants!  Yours may be shorter if you would like.

Fold the rectangle with right sides facing and matching up the two short ends at the top.

See? Lots of room - the lens cover will definitely fit in this bag!

Now, take the fabric to your sewing machine and stitch up the two sides, leaving about an inch to an inch and a half open at the ends.

Ready to stitch!


Visual for the ends staying un-sewn.
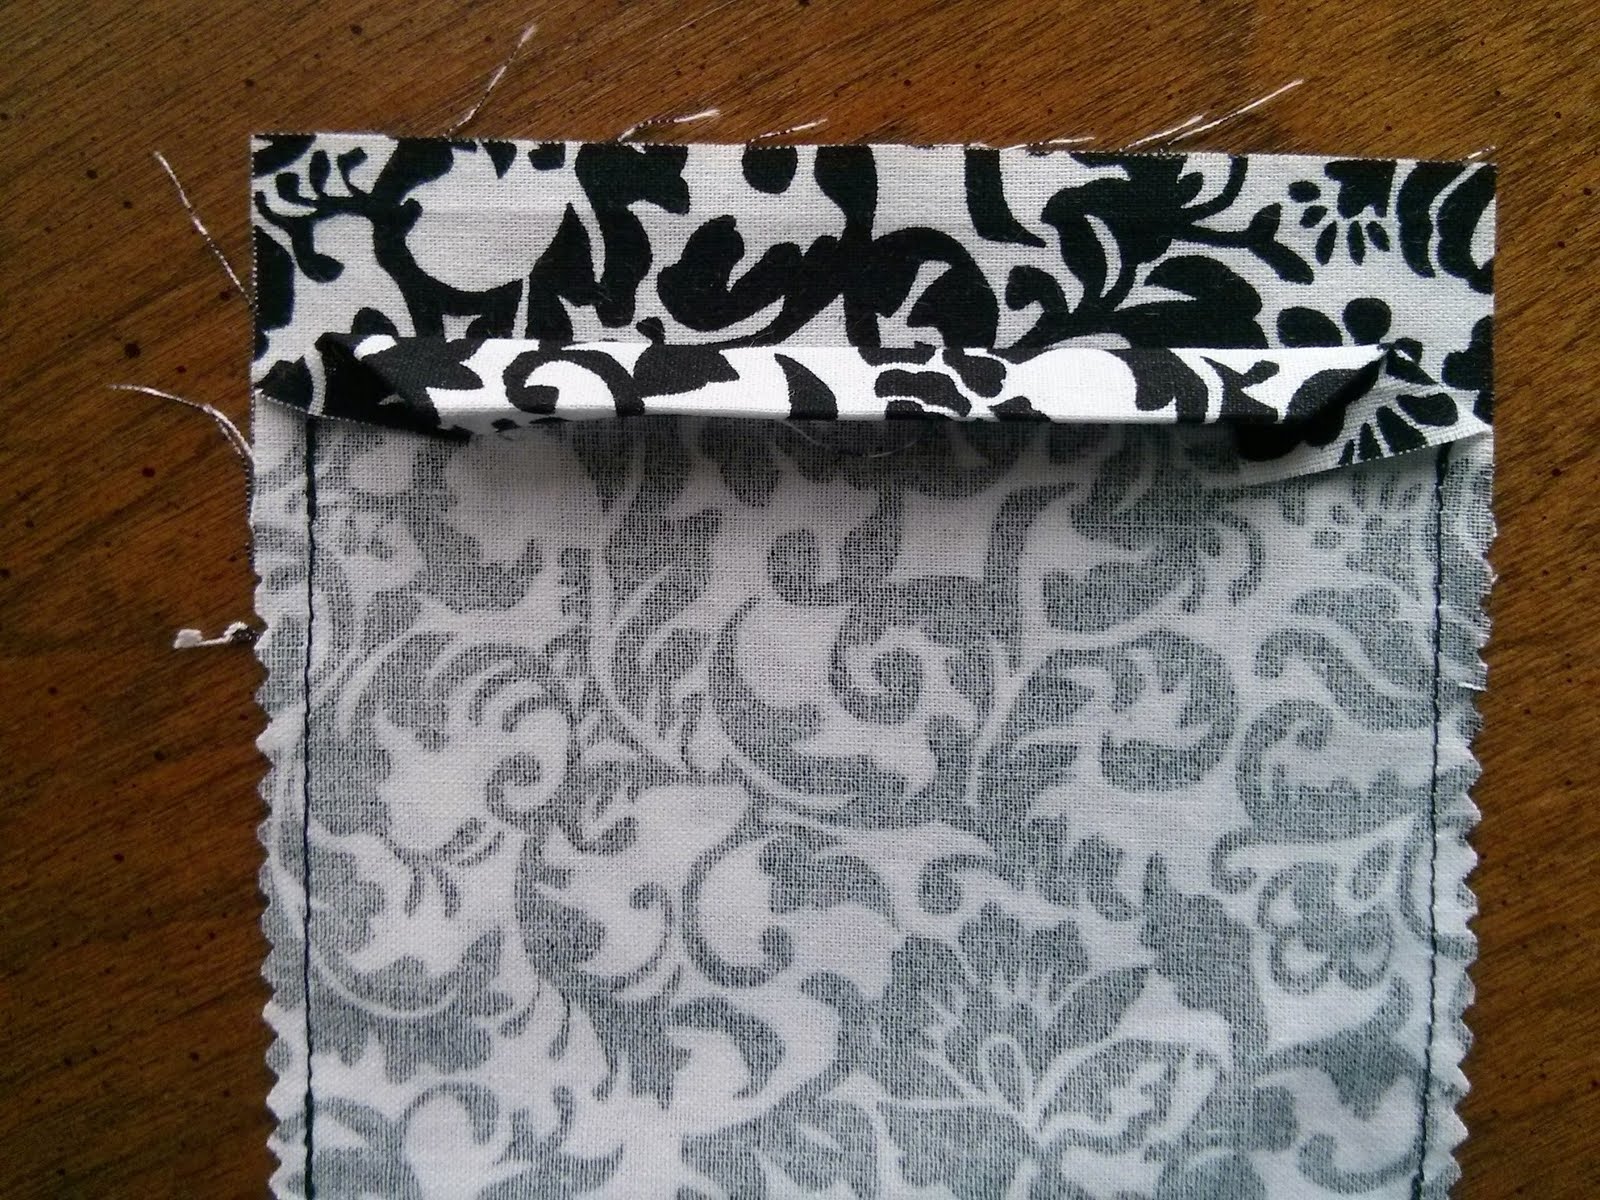
Work with one side at a time.  Take out your iron, and fold in the corners where you didn't sew into nice triangles.  Press with the iron.


Next, fold down the top about 1/4", and press that, too.  

Fold this down about another 1/2" and press.


Next you will want to sew this down.  I stitched this from the end all the way to the other end pretty much right at the edge.


Repeat for the other side.

Mine was off a bit and some of the edges were too raw (hey, I was winging it).


So I re-did the side stitches and ran this part through the sewing machine to finish it off so it won't unravel.


Next, turn right side out, and get ready to string your ribbon!


Here is a picture of the fabrics I used in the strap I had already made, and my color choice for ribbon for my little lens cover drawstring bag.


Grab a big tapestry needle and thread the ribbon onto the needle.  Using the needle, pull the ribbon all the way through one chassis, and then around to the other one.  Your loose ends of the ribbon should now be hanging out the same side of the pouch.

  
For the second piece of ribbon, do the same thing, but pull it through the opposite side from the side you just finished.


Once the ribbon is threaded you are all set!


You can knot the ends of the ribbon together, or attach the pouch to whatever you are making this for.

Thanks a bunch!

Friday, January 3, 2014

Catching Up: My Handmade Holiday

I am a very lucky and very happy woman.  My children are all at a very fun stage where they love to pretend, and love to be with me.  The "baby" is running full speed ahead and doing her best to keep up with her brothers.  They require both of my hands all of the time, and most of the time it's extremely rewarding.  Needless to say, posting here has taken a very back seat (like a seat all the way in the back of a very long bus) to everything else that has been needing my attention.

I made super awesome Halloween costumes for all the kiddos, I took a lot of pictures of that process, too, and someday when things really settle down, I will write up that tutorial.  After Halloween finished, my Christmas crafting planning happened, and I am very pleased with all that I was able to accomplish this year without really being stressed out.  I hope you and your families celebrated a wonderful Christmas and New Year.

My kids made out like handmade gift bandits receiving new crocheted hats and mittens, monogrammed floor poufs, Creature Power Suits that resemble Wild Kratts ones, "laptop" bags for their LeapFrog LeapTops. Embroidered fleece shirts and t-shirts, a crocheted sweater, pirate hats and gnome hats, and so many other gifts I did not make to inspire their creativity, imaginations, and minds.  I currently have the messenger bags, pirate hats and gnome hats available for purchase in my Etsy shop.  To make the floor poufs I followed the amazing tutorial from Living with Punks.


I have four beautiful nieces that are very good to me, and they all let me make them awesome homemade gifts too. The younger two of my girls received slipper socks in exactly the colors they wanted.

My oldest niece belongs in the woods and should have been a cowgirl.  She asked for a pair of Cowgirl Slippers (ha!) and I ended up using the Lion Brand Cowboy Booties pattern for inspiration and creating a pair to fit her gigantic size 8 feet.  Don't worry, I wrote this up too, but I didn't take any pictures so you may or may not see a post on these.  She also asked me for an infinity scarf - and since she's on Pinterest, she was able to send me loads of ideas on exactly what she wanted (and didn't want) and I was able to zip one up to be exactly what she wanted.  Lastly, she let me get creative with my new embroidery machine and I monogrammed a pair of boot socks for her.


My second oldest niece had been hinting since August that she wanted a pair of fingerless Cinderella length gloves in royal blue.  For her, I made up a pair of the beautiful Ripple Lace Fingerless Gloves provided by Bethsco Blog in Red Heart Shimmer Royal and she went bananas.  She's full on into the Mortal Instruments this year, so I also had used black felt, and iron on fusible webbing to cut out the shapes of some of the major runes so she can iron these onto whatever she wants.  The last bit of her gift was that I had digitized one of the runes from the books into a file for my embroidery machine, and offered to put it on any article of clothing for her.  She has me put it on a sweatshirt I had picked up for her, and a pair of jeans.  It came out super cute, and totally made my day that she appreciated it.  In fact, I was psyched that all my nieces truly appreciated their gifts this year.


Hooray for handmade holidays!


Wednesday, October 16, 2013

Project: Hand Print Spiders and Spiderweb on the Wall

Halloween is coming, and it's coming quickly!

I have failed at getting my Halloween decorations out in a timely fashion this year - but my amazing mother has all of her decorations out, as does my grandmother.  We were up at my mom's a few weeks ago, and my boys (one especially) was leery about passing a particular spider decoration she has up. He would eye it, and would avoid walking by it.  Similarly, we were at my grandmother's this past weekend and she had a small spiderweb decoration up over a doorway with a little raffia witch in it, and he eyed that decoration, and made a big deal about it, then proceeded to avoid the area.

I had seen some hand print spiders circulating about on Pinterest, and decided this would be a good time to have them make their own spiders, and a giant spiderweb to squash any fears that might be developing.

We started with the paint - I have a generic acrylic I buy at AC Moore.  I picked black since (as we all know) Halloween spiders are black.  I painted one of the boys hands, then he printed it on the paper, I turned the paper, painted his other hand, and he printed that one.  Then we had the leave the table to wash his hands, and repeated the same process with my other boy.

Here are some fun pictures.

My first guy wiping his hands after finishing making his prints
Now it's my turn!
I put the paint on his hand with a paintbrush.


Press and lift!

A nice smile with his hand prints before jumping up from the table to go wash his hands.

Even the baby is posing with her newly done hand prints.

To keep the hand prints safe, I have to hang them on the fridge to keep them away from the kiddos grabbing them while they are still wet.


Now it was time to create our spider web.  I picked out an area of wall that doesn't currently have any pictures, or anything on it.  The space I found was one side of our hallway - right where the ugly and outdated telephone jack is!

I used the itty bitty Command Hooks and placed them on the wall in an almost circular pattern being sure to have the hook part face out.  
The Command Hooks arranged on the wall space where are are going to build our web.

I strung some black yarn from a top hook, and left a nice long tail at the bottom.
Our first strand hung from the top, with a long tail.

Then I let one of the boys pick a bottom hook, and string the yarn around it.  He did this easily (even if I 
didn't get a picture of it)

My son picked the first spot to loop the yarn around at the bottom of the web.

We then alternated, it was "my turn" and I strung the yarn up around a top hook, and then my other boy got to pick the next spot to loop it around.

Choosing the next spot.
Even the baby got to pick where the yarn was getting strung.  We repeated this, and alternated turns.
Continuing to create our web.

The boys loved this part.


When we were done, I took the yarn and just strung it all around the outside of the hooks to make it look finished.

The yarn strung around the edges to look finished.

I tied the long tail end to the end of our web with a knot, and cut the ends.

Our very fancy knot.

After the spiders were dried, we glued googly eyes to each spider, and then I had the boys tell me where they wanted the spiders to go on their web.  Of course, they wanted them "way up high" and all I did was tape the spider to the yarn (not the wall).

Our spiders in our new web.

Our spiders in the web with the googly eyes.

It really looks cute. And it's very festive.  I like that it is in the central spot like our hallway, because the kids keep commenting on it every time they pass it.

My favorite part - is that my boy who was leery of the spiders and spider web at my mother and grandmother's house was the one that spent the most time with me building it and instead of being afraid of it has now told me several times: "Momma, our spider web is beeeeautiful!".


Thursday, October 10, 2013

Project: Clean that Giant Unidentified Carpet Stain

I enjoy reading and following One Good Thing By Jillee.  I think she has great ideas, great instructions, and I like to pretend that all the DIY housekeeping stuff is something I can keep up on.

Recently, she dug out an old post, and pinned it to her Pinterest Board on a Miracle Carpet Stain Remover.

I am having people over tomorrow night, and thought I could try this before everyone shows up.

Here is said unidentified stain:


Gross!

So I did exactly as said - One part clear ammonia, one part HOT water, and sprayed it on the carpet.  The instructions say "liberally", I need to add that to get it to work, I had to hold the sprayer right up to the carpet and saturate it.  

I put my white towel over it, and ironed.  I didn't notice much at first, because I really did need to saturate it, but as I kept going, I noticed my towel getting gross.

Towel:

The darker spots are where I really sprayed the solution into the carpet.

Lo and BEHOLD!

The yuckiest part of the satin was definitely lifting and coming out of the carpet!  Be warned! This was VERY stinky. And I had the kids up, so I stopped doing the clean up which was why most of the stain is still visible.  When they go to bed, and I don't have to worry about them smelling the stink of the ammonia, I will most decidedly finish the job I started this morning.

It's successful attempts like this one that make me think I can do these DIY home remedy things.  :-)


Thursday, September 12, 2013

Project: Paper Storage Bins for Our Salvaged Kitchen Play Set

My folks are absolutely amazing at finding completely salvageable toys for the kids - for free!  Thanks to her, my kids have a full parking lot of Cozy Coupe's, a play house, baby swing/slide set, wagons, a see-saw, a motorcycle (one of those awesome 6v ones), a sandbox, and a pool to name a few.  She had picked up a kitchen set that we keep at her house, and recently my dad found several more kitchen sets - the best part of these plastic toys is that they can be washed, bleached and magic erased right into a state of kid-ready!  We picked out our favorite "new" kitchen set and brought it home.

After some scrubbing, the kids are enjoying their new playset.  I brought up all the play food my mom had kept from when I was a kid, and this honestly occupies the three year old twins and our 15 month old for extended periods of time.  The food we kept stored in a bin, since one of the drawers was missing from our new kitchen, and all the food didn't fit on the shelves.

This is where my brainstorm for today's activity began.

This is our awesome new kitchen:


This is what my floor looks like when the kids are done playing:


See the big empty bin?  I don't really want to keep the kitchen set and the bin out since they are currently residing on our main living floor.  I wanted to eliminate the use of the bin altogether.

I didn't take pictures of my first few steps, because it didn't occur to me to include this on my blog until after we had begun the project, so you'll have to imagine the first few steps.

Materials:
Frosted Flakes Double Sized Box - we got this from our cereal purchase at BJ's Wholesale Club.
Scrapbooking Paper (because I have it laying around, and it's 12"x12")
Exact-O Knife
Paper Cutter
Ruler
Scissors
Glue Stick (I used the kids')
Glue Gun and Glue Sticks (mine are from my dollar store)
Optional Materials (I did this because I had the materials on hand)
Eyelet Punch
Eyelets
Ribbon
Tapestry Needle


I started by measuring the two shelves I was planning on using the bin with.  From that, I was able to cut two boxes from the same Frosted Flakes box (using the top as one box, and the bottom as a second).  My shelves were different sizes, but I made both boxes the same so I could get two from one cereal box.  I cut the top and bottom of the cereal box to the 6" height I needed.

I then cut the scrapbooking paper with my paper cutter so that it measured a full inch taller than I needed, and about an inch wider than I needed.  In retrospect, if I make this project again, I will make it two inches wider so there is an extra inch on either side.  Because my box measured over 10" on one side, and 6" on the short side, I needed four pieces (one for each face) per box.


I then set the kids to work putting glue on the back of the side pieces first.  I even got the baby in on smacking the paper once it was placed to help stick it to the cereal box.  (I didn't get any pictures of my other son helping)


At the top, I used the scissors to cut a small slit at each corner.


I then folded the top over to the inside of the box.  I added extra glue around all corners and edges.


This is what the top looked like when I finished my first side:


I repeated these steps to finish the other side.


I then did the exact same thing to the front and back of the box.


I repeated the whole thing for my second box!


Then I decided to add the handles.   This is where I gathered my "optional" materials.  I went with what I had on hand.


I first decided where I was going to poke the holes for my ribbon handles.  After looking at my box front and back, I decided I would make the handle two and a half inches from each edge and two inches from the top.


On the inside, I measured and marked where I would punch my holes with my ruler and a pencil.


Then I used my eyelet punch to poke the holes for my eyelets:


I inserted my eyelets and secured them using my eyelet punch tool.

I did this on both the front and back of each of my boxes.


Then I cut some ribbon and threaded it through the eyelet holes using the tapestry needle.


I had to quadruple knot the back of the ribbon so the kids won't pull it out when they use the handles.


Ta-Dah!


The bins look great!


And during nap time, I put all the food away in the kitchen, and was able to remove the bin from my living area!  Everything now has a home!


The kids got a kick out of helping, and I showed them how to use the handles to pull the bins out.  Let's see how long we can keep our kitchen set cleaned!