Showing posts with label boredom buster. Show all posts

Wednesday, October 16, 2013

Project: Hand Print Spiders and Spiderweb on the Wall

Halloween is coming, and it's coming quickly!

I have failed at getting my Halloween decorations out in a timely fashion this year - but my amazing mother has all of her decorations out, as does my grandmother.  We were up at my mom's a few weeks ago, and my boys (one especially) was leery about passing a particular spider decoration she has up. He would eye it, and would avoid walking by it.  Similarly, we were at my grandmother's this past weekend and she had a small spiderweb decoration up over a doorway with a little raffia witch in it, and he eyed that decoration, and made a big deal about it, then proceeded to avoid the area.

I had seen some hand print spiders circulating about on Pinterest, and decided this would be a good time to have them make their own spiders, and a giant spiderweb to squash any fears that might be developing.

We started with the paint - I have a generic acrylic I buy at AC Moore.  I picked black since (as we all know) Halloween spiders are black.  I painted one of the boys hands, then he printed it on the paper, I turned the paper, painted his other hand, and he printed that one.  Then we had the leave the table to wash his hands, and repeated the same process with my other boy.

Here are some fun pictures.

My first guy wiping his hands after finishing making his prints
Now it's my turn!
I put the paint on his hand with a paintbrush.


Press and lift!

A nice smile with his hand prints before jumping up from the table to go wash his hands.

Even the baby is posing with her newly done hand prints.

To keep the hand prints safe, I have to hang them on the fridge to keep them away from the kiddos grabbing them while they are still wet.


Now it was time to create our spider web.  I picked out an area of wall that doesn't currently have any pictures, or anything on it.  The space I found was one side of our hallway - right where the ugly and outdated telephone jack is!

I used the itty bitty Command Hooks and placed them on the wall in an almost circular pattern being sure to have the hook part face out.  
The Command Hooks arranged on the wall space where are are going to build our web.

I strung some black yarn from a top hook, and left a nice long tail at the bottom.
Our first strand hung from the top, with a long tail.

Then I let one of the boys pick a bottom hook, and string the yarn around it.  He did this easily (even if I 
didn't get a picture of it)

My son picked the first spot to loop the yarn around at the bottom of the web.

We then alternated, it was "my turn" and I strung the yarn up around a top hook, and then my other boy got to pick the next spot to loop it around.

Choosing the next spot.
Even the baby got to pick where the yarn was getting strung.  We repeated this, and alternated turns.
Continuing to create our web.

The boys loved this part.


When we were done, I took the yarn and just strung it all around the outside of the hooks to make it look finished.

The yarn strung around the edges to look finished.

I tied the long tail end to the end of our web with a knot, and cut the ends.

Our very fancy knot.

After the spiders were dried, we glued googly eyes to each spider, and then I had the boys tell me where they wanted the spiders to go on their web.  Of course, they wanted them "way up high" and all I did was tape the spider to the yarn (not the wall).

Our spiders in our new web.

Our spiders in the web with the googly eyes.

It really looks cute. And it's very festive.  I like that it is in the central spot like our hallway, because the kids keep commenting on it every time they pass it.

My favorite part - is that my boy who was leery of the spiders and spider web at my mother and grandmother's house was the one that spent the most time with me building it and instead of being afraid of it has now told me several times: "Momma, our spider web is beeeeautiful!".


Thursday, September 12, 2013

Project: Paper Storage Bins for Our Salvaged Kitchen Play Set

My folks are absolutely amazing at finding completely salvageable toys for the kids - for free!  Thanks to her, my kids have a full parking lot of Cozy Coupe's, a play house, baby swing/slide set, wagons, a see-saw, a motorcycle (one of those awesome 6v ones), a sandbox, and a pool to name a few.  She had picked up a kitchen set that we keep at her house, and recently my dad found several more kitchen sets - the best part of these plastic toys is that they can be washed, bleached and magic erased right into a state of kid-ready!  We picked out our favorite "new" kitchen set and brought it home.

After some scrubbing, the kids are enjoying their new playset.  I brought up all the play food my mom had kept from when I was a kid, and this honestly occupies the three year old twins and our 15 month old for extended periods of time.  The food we kept stored in a bin, since one of the drawers was missing from our new kitchen, and all the food didn't fit on the shelves.

This is where my brainstorm for today's activity began.

This is our awesome new kitchen:


This is what my floor looks like when the kids are done playing:


See the big empty bin?  I don't really want to keep the kitchen set and the bin out since they are currently residing on our main living floor.  I wanted to eliminate the use of the bin altogether.

I didn't take pictures of my first few steps, because it didn't occur to me to include this on my blog until after we had begun the project, so you'll have to imagine the first few steps.

Materials:
Frosted Flakes Double Sized Box - we got this from our cereal purchase at BJ's Wholesale Club.
Scrapbooking Paper (because I have it laying around, and it's 12"x12")
Exact-O Knife
Paper Cutter
Ruler
Scissors
Glue Stick (I used the kids')
Glue Gun and Glue Sticks (mine are from my dollar store)
Optional Materials (I did this because I had the materials on hand)
Eyelet Punch
Eyelets
Ribbon
Tapestry Needle


I started by measuring the two shelves I was planning on using the bin with.  From that, I was able to cut two boxes from the same Frosted Flakes box (using the top as one box, and the bottom as a second).  My shelves were different sizes, but I made both boxes the same so I could get two from one cereal box.  I cut the top and bottom of the cereal box to the 6" height I needed.

I then cut the scrapbooking paper with my paper cutter so that it measured a full inch taller than I needed, and about an inch wider than I needed.  In retrospect, if I make this project again, I will make it two inches wider so there is an extra inch on either side.  Because my box measured over 10" on one side, and 6" on the short side, I needed four pieces (one for each face) per box.


I then set the kids to work putting glue on the back of the side pieces first.  I even got the baby in on smacking the paper once it was placed to help stick it to the cereal box.  (I didn't get any pictures of my other son helping)


At the top, I used the scissors to cut a small slit at each corner.


I then folded the top over to the inside of the box.  I added extra glue around all corners and edges.


This is what the top looked like when I finished my first side:


I repeated these steps to finish the other side.


I then did the exact same thing to the front and back of the box.


I repeated the whole thing for my second box!


Then I decided to add the handles.   This is where I gathered my "optional" materials.  I went with what I had on hand.


I first decided where I was going to poke the holes for my ribbon handles.  After looking at my box front and back, I decided I would make the handle two and a half inches from each edge and two inches from the top.


On the inside, I measured and marked where I would punch my holes with my ruler and a pencil.


Then I used my eyelet punch to poke the holes for my eyelets:


I inserted my eyelets and secured them using my eyelet punch tool.

I did this on both the front and back of each of my boxes.


Then I cut some ribbon and threaded it through the eyelet holes using the tapestry needle.


I had to quadruple knot the back of the ribbon so the kids won't pull it out when they use the handles.


Ta-Dah!


The bins look great!


And during nap time, I put all the food away in the kitchen, and was able to remove the bin from my living area!  Everything now has a home!


The kids got a kick out of helping, and I showed them how to use the handles to pull the bins out.  Let's see how long we can keep our kitchen set cleaned!

Friday, June 14, 2013

Project: Toddler Watch

This post contains links to items I used in the activities described.  I get commissions for purchases made through links in this post.  I was not paid by these brands nor did I receive goods or payment to recommend the products, they are just the products I chose for the project.

I had mentioned in my first post that I love pretend play and watching my children in their pretend play.  This project was designed when my boys developed a fascination with my jewelry.  I don't wear much, my wedding and engagement rings, a watch, a bracelet and sometimes earrings.  My watch has a button on it that will illuminate the face in the dark, and once the boys discovered this, I couldn't get them away from my wrist; until I made them their own watches.


Pictured are two toddlers each showing off crocheted watches. The faces of the watches are white, while one watch band is green and the other is blue.


I honestly made these about three months ago, and they have been machine washed at least a dozen times.  They take them to Grammy's house, and wear them around the house and any time we go to a store.  They love having things that make them like mom and dad, so these watches are an important part of their wardrobes and pretend play.

Introducing:  Project Crocheted Toddler Watch

Craft: Crochet

Materials: 

  • Leftover yarn - just reach into your scrap yarn.  I use two colors, white for the "face" of the watch and another color for around the face and the band.
  • I use the H hook to give smaller, tighter stitches, but gauge is not essential to this project as you will make it to fit your child.
Abbreviations:
Magic Loop (ML)
Single Crochet (SC)
Half Double Crochet (HDC)
Double Crochet (DC)
Slip Stitch (Sl St)
Stitch (St)


Directions:


With face of watch color:
Magic Loop.  (Check out this video from Crochet Geek if you need a tutorial)
Round 1:  In ML chain 2. (Does not count as DC). 12 DC in ML. Sl St to first DC to join. Fasten off. (12 DC)

Pictured is the first round of double crochet stitches which form the face of the watch.


Round 2: Join new color for around face and band.
2 SC in each DC. Join with sl st to first SC. (24 SC)

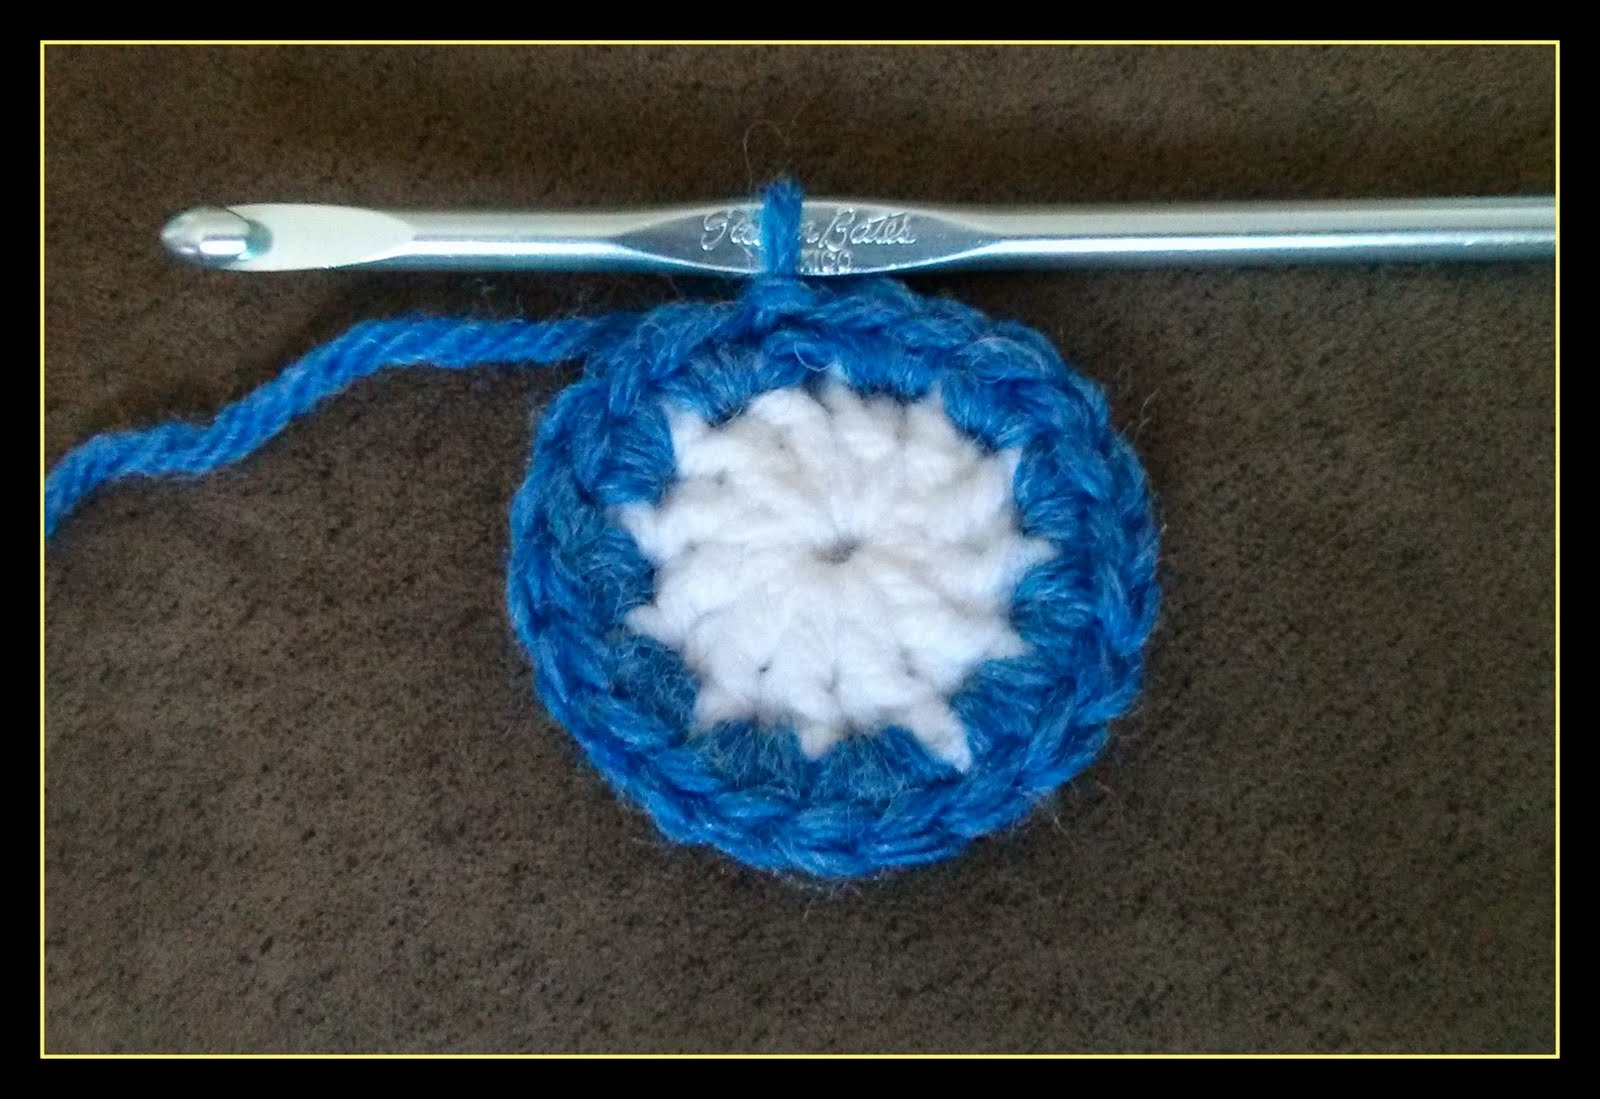
Pictured is the second round of single crochet stitches which form the face of the watch.  The first round is white double crochet, while the second is blue single crochet.


Begin working the band.

Row 1
: Ch 2. HDC in same st and in each of next 3 SC. (4 HDC)

Pictured is the completed face of the crochet watch and the first row of the beginning of the construction of the band of the watch.


Row 2: Ch 2, turn. HDC in same st and in each of next 3 HDC. (4 HDC)
Row 3 - 17: Repeat Row 2 until entire piece measures about 7" (see picture).  For me, this was 17 rows of HDC. Yours may be different depending on the yarn or gauge you use.  Fasten off, weave in ends.

Pictured is the completed face of the watch with the completed band before the watch is seamed together.


Finishing
With wrong side facing, leave seven stitches on either side of the band around the face, sew open band end onto watch face in four remaining stitches.

Diagram showing the completed watch and which stitches should be skipped to sew the band to the face and complete the watch.

Pictured is the completed project - a blue and white crocheted watch for pretend play for a toddler.

There you have it!  A new watch for your tot to put on and off themselves, one that is washable if it gets dirty, and that is very durable.  Also, very easy to make a duplicate if it happens to be left at Grammy's.  Make them in all colors so your little one can coordinate with their clothing or just make one in their favorite color!

Happy crafting!

Wednesday, June 12, 2013

Project: Superhero

I have all these wonderful ideas in my head that I can't wait to begin, however my real life keeps taking over.  I spend my days chasing, cleaning, changing, playing with, teaching and nurturing our three small children.  I wrangle our dog in and out of the house and making sure she doesn't get into too much trouble.  Somehow, the cooking, cleaning, and laundering gets done.  I am blessed with a life I wouldn't have any other way, even if I feel like I need more than two hands most of the time.

My children inspire me to create a lot - many times just so they have something new to play with or an accessory to get them interested in something new.  For this post, I'd like to share something we did a few months ago.

Our boys love superheros and the idea of being a superhero.  Although they've never watched Batman, they will sing "nah-nah-nah-nah-nah-nah-nah-nah-Batman!" right along with us, and certainly know what he looks like.  They have a couple of action figures, and Little People Wheelies Batman characters.

During winter, we were stuck indoors a lot.  The baby wasn't old enough to dress up to take out, and we don't have a fenced in yard.  We had to occupy our days indoors trying to make the "same-old, same-old" not so monotonous.

Introducing:  Project Superhero


This project happened in four stages, and I'm apologizing in advance - I hadn't planned a blog post on this so I promise to be more accurate in my future projects.

Stage 1 was the hastily-thrown-together-so-you-can-play-with-it-right-now version.

Materials:

  • Undetermined amount of bolted felt (like this).  Left over from a costume my mother and I made for my high school senior class play about 12 years earlier.  You can purchase this by the yard at a brick and mortar location.
  • Scissors
  • Length of Yarn (about 20" per mask)
Cape Directions:  All I did was cut a rectangular section of the felt measuring it against the boys to almost resemble a cape. On one end, I cut out a section for their necks and tied the remaining lengths around their necks to stay on. 
Mask Directions:  I cut an oval that would cover their eyes, and cut extremely crude eye holes and nose triangles (see picture).  On either side of the oval, I used a needle to poke a hole and draw yarn through, and tied the yarn behind their heads to secure to their faces.

Results:
The twins thought their new superhero capes and glasses were fantastic.  I cringed every time I saw the hastily cut edges and began planning Stage 2.


Stage 2 was the result of the children going to bed, and me designing much "better" glasses.

Materials:
  • Cape from Stage 1
  • Additional undetermined amount of bolted felt unused from Stage 1
  • Scissors
  • Length of 1/4" braided elastic (like this)
  • Hot glue gun and hot glue sticks
  • Mask Template from Spoonful 

Mask Directions:
Using the template, I cut my mask from the bolted felt.  I cut the length of elastic based on my sons' heads.  Instead of using yarn, I hot glued elastic to each of the sections of the mask above the eyes.  

Results:
The boys were psyched to have glasses they could put on themselves without asking for help.  I was glad to have adorable superheros running around my house.


Stage 3 happened a few months later.  The glasses had fallen apart repeatedly and been repaired repeatedly.  The capes were stretched out from all the knotting and unknotting.  I decided it was time to break out the sewing machine and do this the right way.

Materials:
  • At least 19.5" x 25.5" of flannel print fabric.  One for cape, one for liner. (Check out Fabric.com, they do free shipping on orders over $35!)
  • Two craft magnets (The ones I used are these: Magnetic Buttons)
  • Sewing machine
  • Coordinating thread
  • Iron
  • Brown paper or other paper for creating your pattern
  • Bib for creating your pattern

Pattern:
Using a bib (that fits the child you are making the cape for), I traced half of the neckline onto the edge of the brown paper.  I then drew my cape line so that it flared outwards as I got towards the bottom of the cape.  The cape measures 18" across at the bottom (so you want the flare to end about 9" from the bottom edge of the cape) and 24" from clasp to bottom.  Check out my crude diagram below to get a visual idea of what I mean.


Cape:
Folding your flannel in half, place pattern on the fold and cut one piece of each of your cape and lining.  Pin wrong sides of cape and lining together and stitch around with a 3/4" seam allowance.  Leave a small opening at the bottom so you can flip it right-side out.  When finished stitching, turn cape right side out and iron flat.  Tuck the open ends on the inside when ironing so you no longer see the opening at the bottom.  The trickiest part of the cape was getting the magnets in the collar where they needed to be.  To do this, I dropped two magnets in, and used my fingers to push them waaaaay up in the collar where they needed to be for the clasp.  I then used a running stitch and sewed right across the collar to secure the magnets in the collar.  A quick running stitch about 1/4"from the edge all the way around the cape (including stitching shut the open edge on the bottom) and your cape is complete!


Result:
Very, very excited toddlers to have nice new reversible capes that they could take on and off themselves.

superhero cape tutorial sew toddler diy


Stage 4 was the introduction of new glasses.

The glasses weren't intended to go with the superhero costumes - they were more just so the boys would stop playing with our glasses.

Materials:
Leftover yarn
2 2" Plastic O Rings
Crochet Hook Size I  
Tapestry needle for weaving in ends

Directions:
15 Single Crochet (SC) over one of the O rings.  Chain (Ch) 50.  SC in 2nd Ch from hook, and in each Ch back to O Ring.  15 SC in remainder of O ring.  Join to first SC with Slip Stitch (Sl St). 
Ch 1, turn.
SC in each of next two SC's.  Ch 1, turn.  Holding second O ring up to hook, work 15 SC over the O ring.   Chain (Ch) 50.  SC in 2nd Ch from hook, and in each Ch back to O Ring.  15 SC in remainder of O ring.  Join to Ch 1 with Sl St. Fasten off, weave in ends.

Results:
Much more durable "glasses" that the kids constantly wear.


I think this post was long enough.  I can't believe how long it took to write out!

I look forward to comments from you, getting to know you, and you getting to know me through future posts.  I know some of the directions here may be unclear, but I promise to do much better with additional projects!

Happy crafting!